Data Privacy Regulations
Explore the guidelines below to ensure best practices when using the X3M SDK to comply with Data Privacy and Child-Directed regulations, including GDPR, CCPA, COPPA, and other relevant standards.
In adherence to data privacy regulations, avoid transmitting personal user information (such as age, gender, etc.) through the custom user properties initialization option. Please be aware that X3M disclaims responsibility for managing such information for users identified as children, as this could potentially violate existing regulations.
Integrate with a Consent Management Platform (CMP)
Privacy regulations like GDPR, require publishers to obtain user consent before collecting personal data or serving personalized ads. A Consent Management Platform (CMP) helps ensure compliance by automatically handling complex privacy law requirements across different regions, presenting standardized consent forms that users recognize and trust, managing consent signals and communicating them to ad partners, and staying current with evolving privacy legislation without requiring app updates.
Option 1: Enable CMP Automation
X3M provides a mechanism for automating the integration with Google's User Messaging Platform. To enable this feature, set the flag isCMPAutomationEnabled to true.
Google's User Messaging Platform (UMP) is a consent management solution that helps publishers comply with privacy regulations like GDPR and US IAB. The UMP SDK automatically determines when to show consent forms based on the user's location and regulatory requirements.
Why Use X3M's CMP Automation?
X3M's CMP Automation feature streamlines the integration process by:
- Automatic Geography Detection: Detects user location to determine if consent is required.
- Seamless Integration: Works alongside iOS App Tracking Transparency (ATT).
- Reduced Development Time: Eliminates manual consent flow implementation.
- Compliance Assurance: Ensures proper handling of GDPR.
When to Enable CMP Automation
Enable CMP automation (isCMPAutomationEnabled: true) when:
- Your app serves users in regulated regions.
- You want automated consent management without manual implementation.
- You need to combine UMP consent with iOS ATT permissions.
Prerequisites
Before enabling CMP automation, ensure you have:
- Google UMP SDK installed in your project
- AdMob Application ID configured in
AndroidManifest.xml - Privacy messages created in your AdMob account
For detailed setup instructions, see Google's UMP Android documentation.
- Kotlin
- Java
XMediatorAds.startWith(
    activity = activity,
    appKey = "<your-app-key>",
    initSettings = InitSettings(
        consentInformation = ConsentInformation(
            isCMPAutomationEnabled = true
        )
    ),
    initCallback = { result -> }
)
boolean isConsentInformationEnabled = true;

XMediatorAds.startWith(
        activity,
        "<your-app-key>",
        new InitSettings.Builder()
                .setConsentInformation(new ConsentInformation(
                        null,
                        null,
                        null,
                        isConsentInformationEnabled,
                        null))
                .build(),
        initResult -> {
            return Unit.INSTANCE;
        }
);
This will prompt the user for consent only when required, and continue with the SDK initialization after the signals have been collected.
Google UMP Automation Flow for Android
This flowchart illustrates the automated Google User Messaging Platform (UMP) integration with X3M SDK on Android.
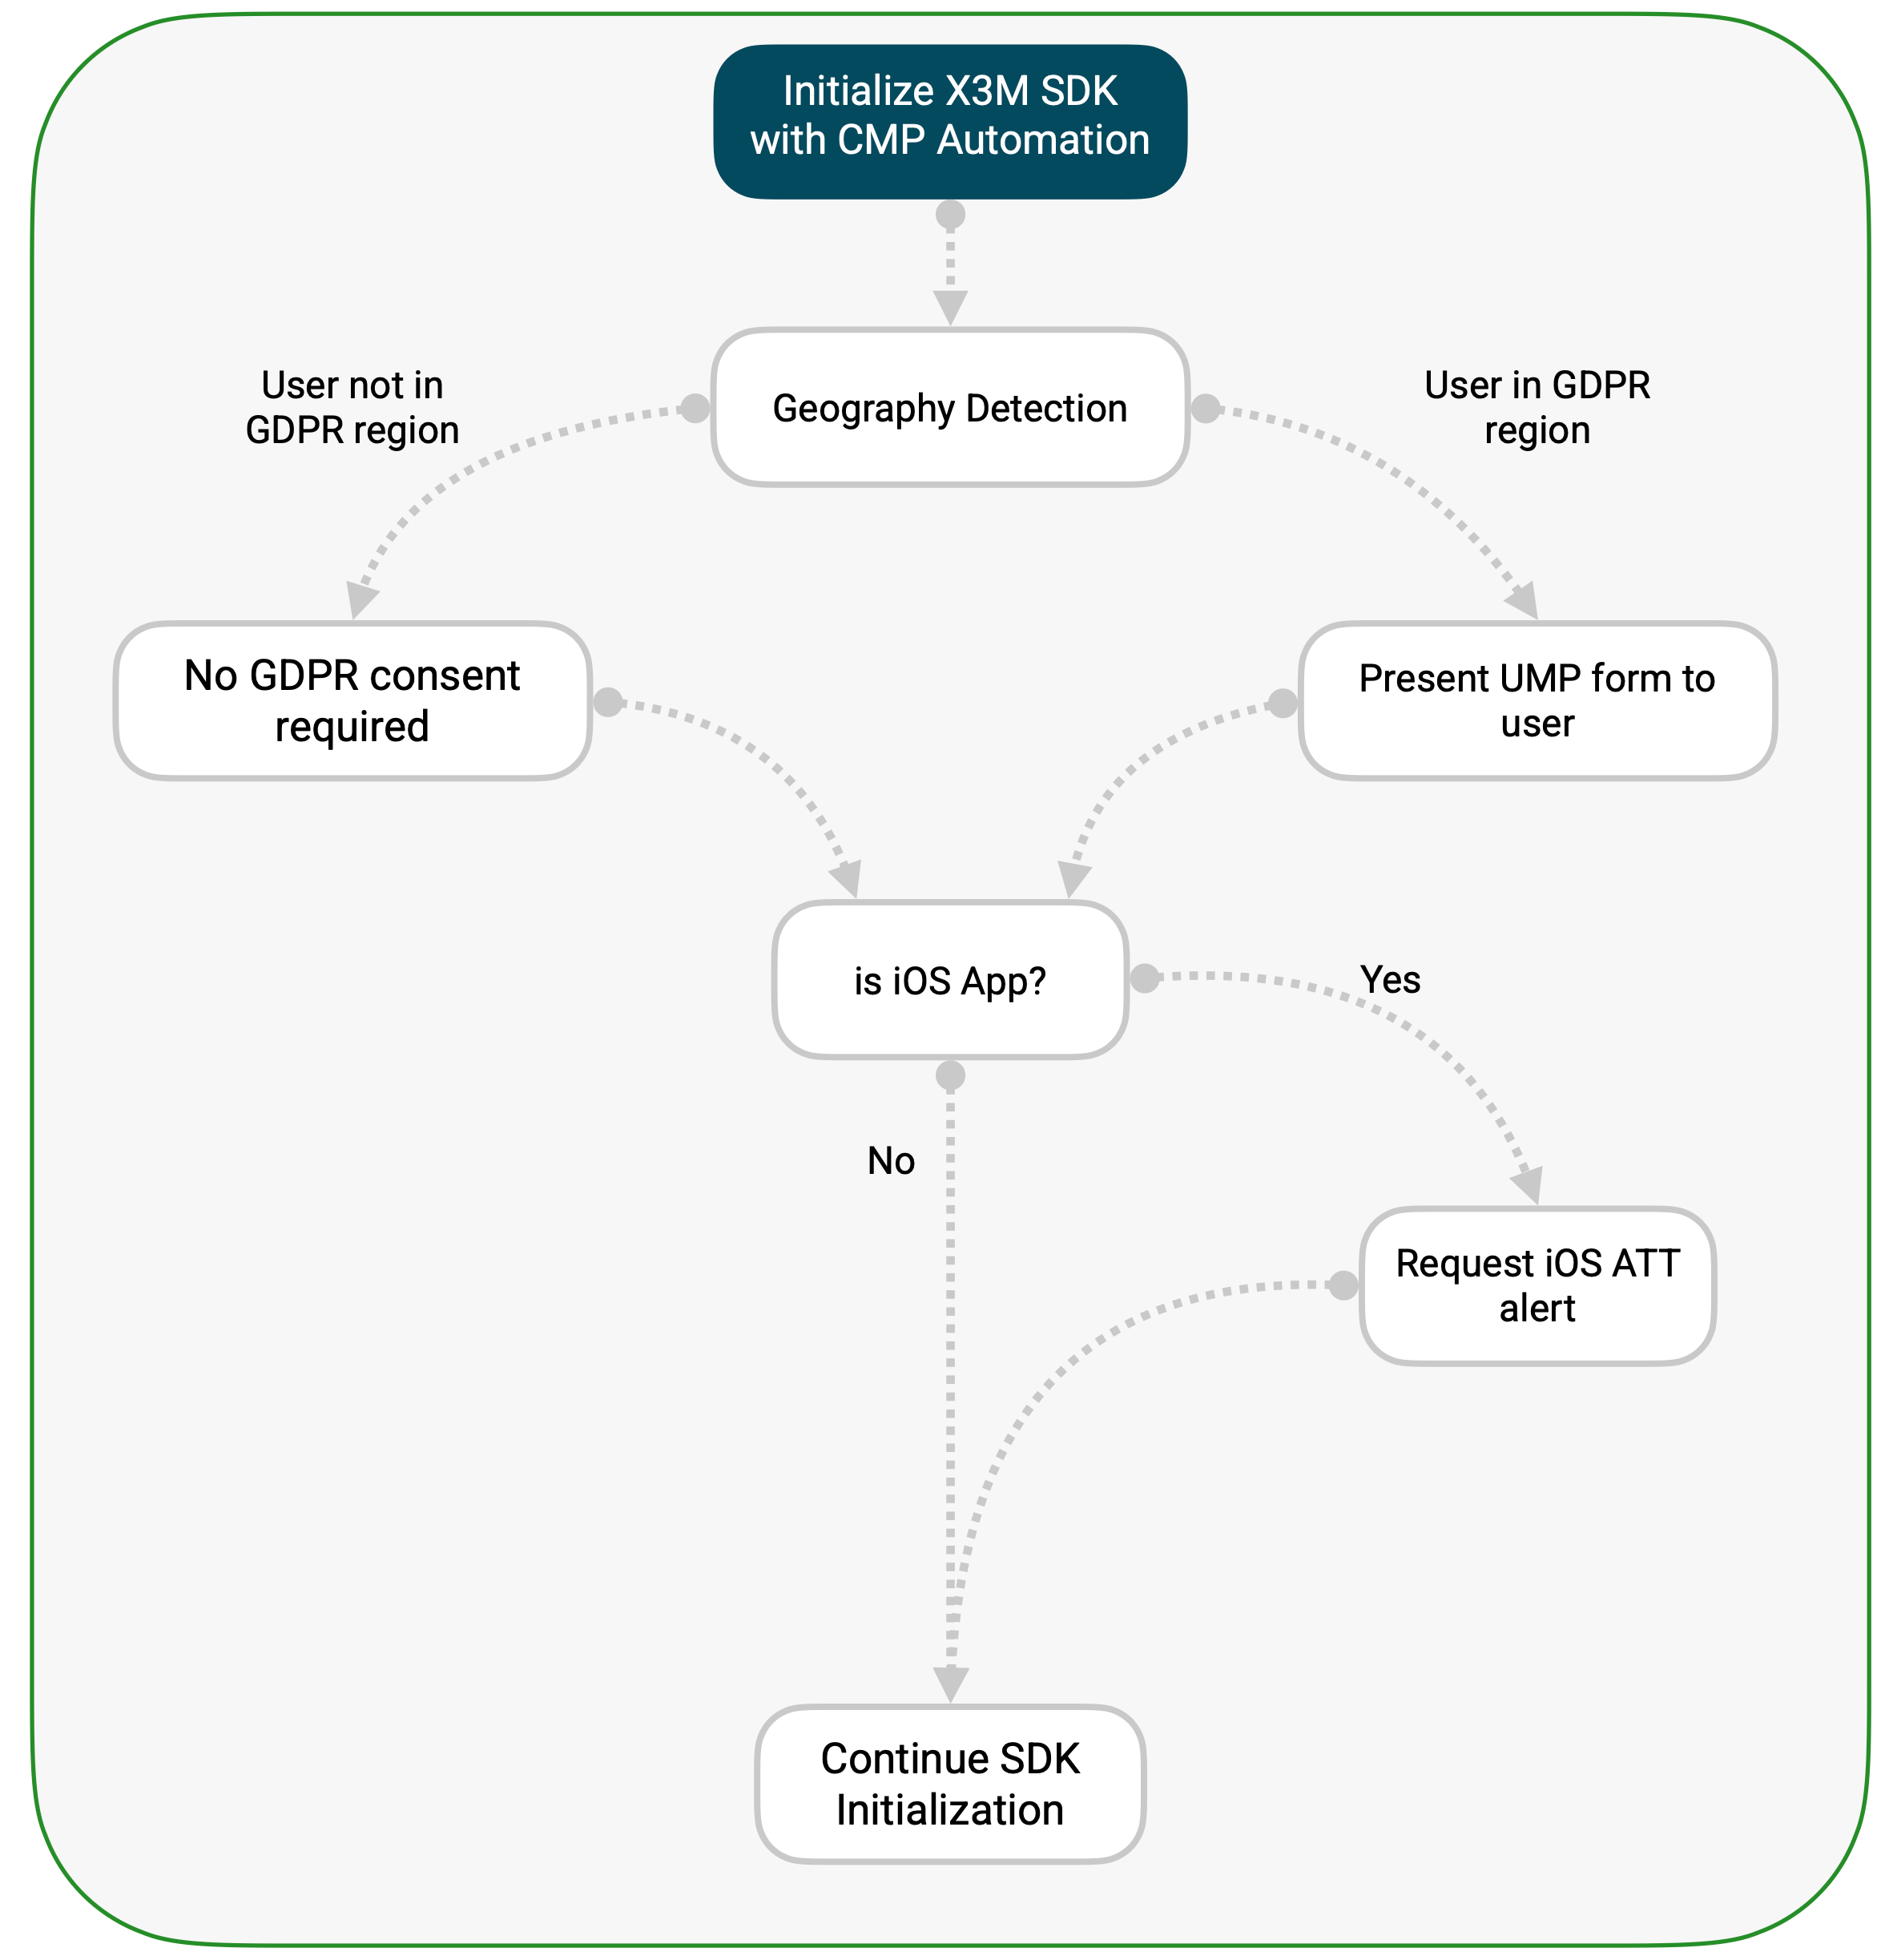
- App Launch → Initialize X3M SDK with CMP Automation enabled
- Google UMP → Automatically detects user's location and presents consent form if required
- SDK Ready → Begin ad requests after consent collection
The UMP SDK on Android automatically handles GDPR consent collection based on the user's geographic location. No additional permissions dialogs are required on Android, unlike iOS which requires App Tracking Transparency (ATT).
Key Points for Android
- UMP Form: Only shown for users in regulated regions.
- Automatic Detection: Geographic location automatically detected.
- No Additional Permissions: Unlike iOS, no system-level tracking permission required.
- Consent Signals: TCF and Additional Consent strings automatically forwarded to ad partners.
Display a Privacy Settings button inside your app
To give users the option to change their consent during the session, you may want to display a button in your app's settings when a form is available. X3M's SDK provides the following methods to achieve this:
- Kotlin
- Java
if (XMediatorAds.CMPProvider.isPrivacyFormAvailable(context)) {
    // ... display the privacy settings form button
}

// [...]

XMediatorAds.CMPProvider.showPrivacyForm(activity) { error ->
    if (error != null) {
        Log.d("PrivacyForm", "Error: $error")
    }

    Log.d("PrivacyForm", "showPrivacyForm complete!")
}
if (XMediatorAds.getCMPProvider().isPrivacyFormAvailable(context)) {
    // ... display the privacy settings form button
}

// [...]

XMediatorAds.getCMPProvider().showPrivacyForm(activity, error -> {
    if (error != null) {
        Log.d("PrivacyForm", "Error: $error");
    }

    Log.d("PrivacyForm", "showPrivacyForm complete!");
    return Unit.INSTANCE;
});
Debug your integration
When using the CMP Automation feature, you can use the following methods to debug your integration:
Debug settings and methods should only be used during development and testing. Remove all debug configurations before releasing your app to production to ensure proper consent collection and compliance.
- Kotlin
- Java
// Configure a Debug Geography to trigger Privacy Form display
XMediatorAds.startWith(
    activity = activity,
    appKey = "<your-app-key>",
    initSettings = InitSettings(
        consentInformation = ConsentInformation(
            isCMPAutomationEnabled = true,
            cmpDebugSettings = CMPDebugSettings(
                cmpDebugGeography = CMPDebugGeography.EEA  // Available options: Disabled, EEA and NotEEA
            )
        )
    ),
    initCallback = { result -> }
)

// Clear the collected consent signals from the device
XMediatorAds.CMPProvider.reset(context)
// Configure a Debug Geography to trigger Privacy Form display
XMediatorAds.startWith(
        activity,
        "<your-app-key>",
        new InitSettings.Builder()
                .setConsentInformation(new ConsentInformation(
                        null,
                        null,
                        null,
                        isCMPAutomationEnabled,
                        new CMPDebugSettings(
                                CMPDebugGeography.EEA.INSTANCE  // Available options: Disabled, EEA and NotEEA
                        )))
                .build(),
        initResult -> {
            return Unit.INSTANCE;
        }
);

// Clear the collected consent signals from the device
XMediatorAds.getCMPProvider().reset(context);
Testing Different Scenarios
To thoroughly test your privacy integration, consider these scenarios:
Geographic Testing:
- Use
.EEAto test GDPR consent forms for European users - Use
.notEEAto test non-regulated regions (no consent required) - Use
.disabledto test without geographic restrictions
Consent Flow Testing:
- First Launch: Clear consent data using
reset()or made a clean install to simulate new user experience. - Returning User: Test with existing consent to verify proper signal handling
- iOS ATT Integration: Verify ATT dialog appears after UMP consent (iOS only)
- Privacy Settings: Use the Debugging Suite Privacy Settings to verify consent status and view TCF, AC, CCPA strings
Option 2: Custom integration with a CMP
Another option is to integrate your app or game directly with the CMP, without relying on X3M's automation. The recommended workflow is as follows:
- First, request the CMP to update the consent requirements for the user.
- If the consent has been granted on a previous session, continue with X3M's initialization without waiting for the requirements update, in order to reduce latency.
- Wait for the consent requirements update request to complete.
- Launch the CMP's privacy form if available and await for its completion.
- For iOS apps: If your CMP doesn't manage iOS App Tracking Transparency (ATT), request ATT permission after collecting GDPR consent.
- Then, initialize X3M's XMediator SDK, and wait for the initialization callback to complete.
- By this point, you can start requesting ads.
This approach ensures that all required consent signals are collected before the ad mediation begins.
For specific instructions on how to implement this workflow using your chosen CMP, please refer to its official documentation.
Consent String Collection and Forwarding
Loomit supports reading and forwarding both TCF (Transparency and Consent Framework) and Google Additional Consent strings to other mediation partners. Here's how it works:
-
TCF String: Loomit automatically reads the TCF string stored by the CMP on the device. This string is then forwarded to compatible ad networks and mediation partners that support TCF.
-
Google Additional Consent String: Similarly, Loomit reads the Google Additional Consent string if available. This string is forwarded to ad networks that support this format.
-
Automatic Forwarding: Once these consent strings are read, Loomit automatically forwards them to the appropriate ad networks and mediation partners during ad requests. This ensures that user consent preferences are respected across the entire ad serving process.
-
Consent Updates: If the user updates their consent choices during a session, Loomit will detect these changes and update the consent information for subsequent ad requests.
-
Partner Compatibility: It's worth noting that some mediation partners automatically read these consent strings from the device. In such cases, there's no need for Loomit to forward the strings to these partners, as they will access the information directly.
When integrating a custom CMP, ensure that it supports the generation of both TCF and Google Additional Consent strings. Not all CMPs support both formats, so it's crucial to verify this capability before integration. For more information on these consent string formats, refer to:
Consent Information API
XMediator provides a mechanism to forward the user consent to each advertising partner.
For more information about the data privacy regulations that may apply to your product please refer to IAB's Standards. Please note that XMediator is not a replacement to a Consent Management Platform. If you wish to integrate one please refer to IAB's authorized CMP list.
Manage user consent
To indicate whether the user has given consent to be served personalized ads please use the hasUserConsent flag as shown below:
- Kotlin
- Java
XMediatorSdk.initialize(
    activity = activity,
    appKey = "<your-app-key>",
    initSettings = InitSettings(
        consentInformation = ConsentInformation(
            hasUserConsent = true
        )
    ),
    initCallback = { result -> }
)

// [...]

XMediatorSdk.setConsentInformation(
    ConsentInformation(
        hasUserConsent = true
    )
)
Boolean hasUserConsent = true;

XMediatorAds.startWith(
        activity,
        "<your-app-key>",
        new InitSettings.Builder()
                .setConsentInformation(new ConsentInformation(
                        hasUserConsent,
                        null,
                        null,
                        false,
                        null))
                .build(),
        initResult -> {
            return Unit.INSTANCE;
        }
);
Integration considerations:
- Please note that XMediator does not generate a GDPR Consent String (see Consent String and Vendor List Format) as using a CMP would. Some ad sources may still require you to integrate a CMP in order to serve ads to european users.
- If the user is not affected by EU's GDPR you should avoid setting these flags as it may have a negative effect on the ad mediation performance.
For more information on X3M's approach to GDPR please reach out to us.
Opt-out of sale flag
You can use this flag to indicate whether the user has opted out of the sale of their personal information.
If the user does not opt out, please set the doNotSell flag as shown below:
- Kotlin
- Java
XMediatorSdk.initialize(
    activity = activity,
    appKey = "<your-app-key>",
    initSettings = InitSettings(
        consentInformation = ConsentInformation(
            doNotSell = false
        )
    ),
    initCallback = { result -> }
)

// [...]

XMediatorSdk.setConsentInformation(
    ConsentInformation(
        doNotSell = false // Corrected typo
    )
)
Boolean doNotSell = true;

XMediatorAds.startWith(
        activity,
        "<your-app-key>",
        new InitSettings.Builder()
                .setConsentInformation(new ConsentInformation(
                        null,
                        doNotSell,
                        null,
                        false,
                        null))
                .build(),
        initResult -> {
            return Unit.INSTANCE;
        }
);
Integration considerations:
- If the user is not affected by California's CCPA you should avoid setting these flags as it may have a negative effect on the ad mediation performance.
For more information on X3M's approach to CCPA please reach out to us.
Child directed flag
You can use this flag to indicate whether the user must be treated as a child. To do this, set the isChildDirected flag as shown below:
- Kotlin
- Java
XMediatorSdk.initialize(
    activity = activity,
    appKey = "<your-app-key>",
    initSettings = InitSettings(
        consentInformation = ConsentInformation(
            isChildDirected = true
        )
    ),
    initCallback = { result -> }
)

// [...]

XMediatorSdk.setConsentInformation(
    ConsentInformation(
        isChildDirected = true
    )
)
Boolean isChildDirected = true;

XMediatorAds.startWith(
        activity,
        "<your-app-key>",
        new InitSettings.Builder()
                .setConsentInformation(new ConsentInformation(
                        null,
                        null,
                        isChildDirected,
                        false,
                        null))
                .build(),
        initResult -> {
            return Unit.INSTANCE;
        }
);
Integration considerations:
- If the user is not subject to the Children's Online Privacy Protection Rule you should avoid setting these flags as it may have a negative effect on the ad mediation performance.
For more information on how X3M complies with COPPA, please visit the COPPA Compliance Guidelines for Apps on X3M Platform